Explore our library of past events, webinars, and trainings whenever you're ready.

16 June 2026
SAP Master Data Governance is designed to improve data quality, but too often it introduces rigid workflows, slow change cycles, and heavy reliance on IT. The result is bottlenecks that limit agility and prevent business users from taking ownership.

23 June 2026
AI is changing how work gets done, but it’s also exposing a new enterprise challenge. Organizations don’t just need more automation. They need better control.
1 April 2020
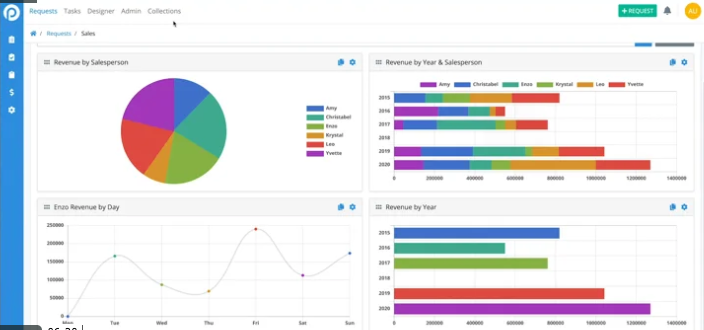
See how to build intelligent reports and charts in ProcessMaker. Starting with any process, we show you how to build a report with custom columns and calculations. Later add beautiful charts to bring your reports to life. Show totals, mean, min, average calculations. Build bar, pie, line charts and more.
1 April 2020
Financial institutions are in a rush to begin offering Paycheck Protection Program loans under the new CARES Act. In order to begin offering these SBA loans immediately, banks need a digital forms and workflow system that handles business rules, underwriting, loan approvals, and keeps a sophisticated audit trail. The system should also be able to connect to existing backend systems and the SBA's E-tran system. ProcessMaker's solution is ready to implement today.
24 January 2020
This video is a recording of the ProcessMaker 4 Launch Webinar held Friday January 24th at 12:00pm ET. Request a demo of ProcessMaker 4 today at https://www.processmaker.com/request-a-demo/

8 January 2020
In this demo learn how ProcessMaker works with third-party tools such as Amazon Textract and UiPath. This demo will show how financial institutions can use ProcessMaker to meet KYC (Know Your Customer) requirements inside their account opening processes. First, we will show how to automate the verification of a driver's license using Amazon Textract to perform OCR (optical character recognition) in order to ensure that the address on the driver's license matches the address filled out on the webform of the application. Second, we will perform an automated lookup on an OFAC website to verify that our applicant is not a known terrorist. To do this we will deploy a UIpath Robotic Process Automation bot.
16 October 2019
This video shows you how to begin a leave of absence request the end user must first log into his ProcessMaker account.
16 October 2019
This video shows you the start of the purchase request process.
16 October 2019
ProcessMaker features a native Document Management System built into its core, available in both Community and Enterprise versions. This system allows users to define a folder structure for Input Documents and Output Documents. Process Map Input Documents are files associated with a particular case. These files can be text documents, spreadsheets, images, etc. From the main toolbar, click on the “Create” button next to “Input Documents”. On the next screen, give your document a title, a type, and a description if you wish. You can enable versioning if necessary. The destination path is a directory in the document repository, which can be static or dynamic. For a dynamic destination path, use the variable picker to select a variable from the list. The value of this variable will be used on the destination path each time a document is uploaded. You can define tags for the document in the same way. Additionally, it is possible to define allowed file extensions and maximum file size for uploaded documents. Click on "Save" when finished. Output Documents are files generated while running a case, which are meant to be printed out or stored digitally outside ProcessMaker. In order to create an Output Document; from the main toolbar, click on the “Create” button next to “Output Documents”. Give your document a title, and specify a static or dynamic filename. You can then give your document a description and specify a media type and margin size. Output documents can be generated in either Doc or PDF format, or both. You can also specify PDF security, which allows you to set permissions and password protection to keep your document restricted to selected users. As with Input Documents, you can enable versioning, a dynamic destination path and tags. When you are done, click on “Save”. Now that the properties of your Output Document are defined, click on “OPEN EDITOR” to start designing its content. You can use the text editor to create a template, or simply upload a pre-built HTML design from your hard drive. Use the variable picker to insert information from your process. Click on “Save” to finish. Multiple File Uploader Input Documents can be viewed as reference by subsequent users; and also downloaded, updated, and re-uploaded thanks to the ProcessMaker’s versioning capability. Generate Output Document Output Documents are useful for creating external records of case data; as well as creating formatted output such as bills, receipts, and letters. Notice that the data input into the Dynaform, has replaced the field names from the Output Document template. Also notice the dynamic filename at the top. Document Management System (DMS) You can view completed Input and Output documents at anytime, by navigating to the “Home” area and clicking on “Documents” from the case menu. Here you will see the directories you specified when creating your documents. You can easily navigate through the directories and view information pertain to each document. In addition you also have the ability to upload and download documents from the repository. Business Process Management and Document Management have always been two closely related applications. Thanks to ProcessMaker’s native Document Management System, you can utilize both, from one easy-to-use interface.
16 October 2019
This video shows you how to add a new pool to your process design.
16 October 2019
Let's build a simple application in AngularJS to get a ProcessMaker user's case list, using the new ProcessMaker REST API. It is way easier than it sounds, I swear. First and foremost the requirements What you need: ProcessMaker version 2.8 or later A server running Apache or a similar web server. The proper file permissions to create/copy files inside the Apache public directory. What I am using: A centOS server with ProcessMaker 3.0 running. A local Wamp Server installed on Windows 8. All the necessary files are going to be created in the root of mywww Wamp directory. Registering our new application Let's start by registering the new application in our ProcessMaker server, in order to be provided with a OAuth Client ID and a Client Secret ID: Log into your ProcessMaker server: Open the following URL from your browser: Don't forget to use your own ProcessMaker server address and your workspace name. We are going to use this interface to register our external application: Click on "New" Define the following characteristics for your new application and click on "Register Application": - Name: caselister - Description: Example REST application to obtain the list of cases from a user's inbox. - Website: processmaker.com This operation will generate a Client ID Number and a Client Secret ID Number for your application, we are going to use both to access this ProcessMaker server externally. You can display your application details at any time, by selecting it from the list and clicking on "Detail": That's it. You may register as many applications as you need. Adding Some AngularJS Magic If this is your first time using AngularJS, you can check out this amazing free course in Code School, which practically cover all the basics about AngularJS. Creating the app.js file Inside your www root directory - in my case C:\wamp\www - create a new JavaScript file called app.js, with the following source code: This file contains all the necessary JavaScript code to establish the external connection to your ProcessMaker server. Now let me walk you through the code, so you know what it does exactly: Connection parameters In the following lines of code (8 to 17), we define the necessary authentication credentials, which include our ProcessMaker server URL, workspace name, client ID, and client secret. Enter YOUR ProcessMaker server URL and workspace name: YOUR client ID and client secret ID (from your registered application details): And save the file. If you're wondering "what about the username and password?", don't worry we're going to get them from a web form. POST request Here is where all the magic happens. Take a look at the login() function (lines 22 to 43): login() executes a POST request to our ProcessMaker Server, specifically to this address… using the recently defined credentials as parameters, in order to obtain an access token. In case of an error arising during the POST request execution, this function displays an alert box with the error description. Otherwise, executes a GET request to the following address... using the access token as bearer, in order to obtain the authenticated user's inbox cases. Notice we're using the "/cases" end point to obtain a user's list of inbox cases. Each REST endpoint is a web address which provides access to a specific ProcessMaker service, such as getting a list of cases or creating a user. Creating the application home page Create a new file called "index.html" in your Apache www root directory, with the following source code: This file contains all the HTML structure for our application home page. Notice the AngularJS directives and expressions used. Reviewing the code About the content of our <head> tags, you'll notice that all the necessary external and internal resources are loaded: The ProcessMaker favicon, Bootstrap CSS, Angular JS, and of course our app.js file. Additionally, our HTML structure includes: A panel to display all your ProcessMaker Server details: URL, workspace name, client ID, and client secret: A brief form to allow users to enter a valid username and password combination: And a table to display the received case list details: Believe it or not, your application is ready. Continue to the next step to see it in action. Your external application in action So you have your application ready? Great! Let's see how it works. Make sure your Apache server is running and open your application URL address in your favorite browser. In my case, I have my application in my local Apache www root directory, thus I'm just going to access my localhost. You should get something like... Take a look at your ProcessMaker server details: Cool, right? Enter a valid username and password combination, and click on "Get Case List". I'm going to use my admin user credentials. The complete case list of the authenticated user will be displayed in a cool looking table below: Now, what just happened? The application connected to your ProcessMaker server, using the entered user credentials to authenticate and get an access token. Then it used this token to request the complete case list for the authenticated user. Now that you have this application running, you can modify it to create a complete external user interface for your ProcessMaker server. Some extra resources for you Find more detailed information about the new ProcessMaker REST API, including: Available OAuth 2.0 authentication methods, the complete list of end points, and some cool examples; in our Official Documentation Page.